Enable and configure Microsoft Defender Antivirus protection capabilities
Изменить
Twitter LinkedIn Facebook Адрес электронной почты
- Статья
- Чтение занимает 5 мин
Applies to:
- Microsoft Defender for Endpoint Plan 1
- Microsoft Defender for Endpoint Plan 2
- Microsoft Defender Antivirus
Platforms
- Windows
Always-on protection consists of real-time protection, behavior monitoring, and heuristics to identify malware based on known suspicious and malicious activities.
These activities include events, such as processes making unusual changes to existing files, modifying or creating automatic startup registry keys and startup locations (also known as autostart extensibility points, or ASEPs), and other changes to the file system or file structure.
Enable and configure always-on protection in Group Policy
You can use Local Group Policy Editor to enable and configure Microsoft Defender Antivirus always-on protection settings.
To enable and configure always-on protection:
Open Local Group Policy Editor, as follows:
In your Windows 10 or Windows 11 taskbar search box, type gpedit.
Under Best match, select Edit group policy to launch Local Group Policy Editor.
In the left pane of Local Group Policy Editor, expand the tree to Computer Configuration > Administrative Templates > Windows Components > Microsoft Defender Antivirus.

Configure the Microsoft Defender Antivirus antimalware service policy setting.
In the Microsoft Defender Antivirus
Then select OK.
Configure the Microsoft Defender Antivirus real-time protection policy settings, as follows:
In the Microsoft Defender Antivirus details pane, double-click Real-time Protection. Or, from the Microsoft Defender Antivirus tree on left pane, select Real-time Protection.
In the Real-time Protection details pane on right, double-click the policy setting as specified in Real-time protection policy settings (later in this article).
Configure the setting as appropriate, and select OK.
Repeat the previous steps for each setting in the table.
Configure the Microsoft Defender Antivirus scanning policy setting, as follows:
From the Microsoft Defender Antivirus tree on left pane, select Scan.
In the Scan details pane on right, double-click Turn on heuristics, and set it to Enabled.
Select OK.
Close Local Group Policy Editor.

Real-time protection policy settings
| Setting | Default setting |
|---|---|
| Turn on behavior monitoring The antivirus engine will monitor file processes, file and registry changes, and other events on your endpoints for suspicious and known malicious activity. | Enabled |
| Scan all downloaded files and attachments Downloaded files and attachments are automatically scanned. This scan operates in addition to the Windows Defender SmartScreen filter, which scans files before and during downloading. | Enabled |
| Monitor file and program activity on your computer The Microsoft Defender Antivirus engine makes note of any file changes (file writes, such as moves, copies, or modifications) and general program activity (programs that are opened or running and that cause other programs to run). | Enabled |
| Turn on raw volume write notifications Information about raw volume writes will be analyzed by behavior monitoring. | Enabled |
| Turn on process scanning whenever real-time protection is enabled You can independently enable the Microsoft Defender Antivirus engine to scan running processes for suspicious modifications or behaviors. This is useful if you have temporarily disabled real-time protection and want to automatically scan processes that started while it was disabled. | Enabled |
| Define the maximum size of downloaded files and attachments to be scanned You can define the size in kilobytes. | Enabled |
| Configure local setting override for turn on behavior monitoring Configure a local override for the configuration of behavior monitoring. This setting can only be set by Group Policy. If you enable this setting, the local preference setting will take priority over Group Policy. If you disable or do not configure this setting, Group Policy will take priority over the local preference setting. | Enabled |
| Configure local setting override for scanning all downloaded files and attachments Configure a local override for the configuration of scanning for all downloaded files and attachments. This setting can only be set by Group Policy. If you enable this setting, the local preference setting will take priority over Group Policy. If you disable or do not configure this setting, Group Policy will take priority over the local preference setting. | Enabled |
| Configure local setting override for monitoring file and program activity on your computer Configure a local override for the configuration of monitoring for file and program activity on your computer. | Enabled |
| Configure local setting override to turn on real-time protection Configure a local override for the configuration to turn on real-time protection. This setting can only be set by Group Policy. If you enable this setting, the local preference setting will take priority over Group Policy. If you disable or do not configure this setting, Group Policy will take priority over the local preference setting. | Enabled |
| Configure local setting override for monitoring for incoming and outgoing file activity Configure a local override for the configuration of monitoring for incoming and outgoing file activity. This setting can only be set by Group Policy. If you enable this setting, the local preference setting will take priority over Group Policy. | |
| Configure monitoring for incoming and outgoing file and program activity Specify whether monitoring should occur on incoming, outgoing, both, or neither direction. This action is relevant for Windows Server installations where you have defined specific servers or Server Roles that see large amounts of file changes in only one direction and you want to improve network performance. Fully updated endpoints (and servers) on a network will see little performance impact irrespective of the number or direction of file changes. | Enabled (both directions) |

 This setting can only be set by Group Policy. If you enable this setting, the local preference setting will take priority over Group Policy. If you disable or do not configure this setting, Group Policy will take priority over the local preference setting.
 If you disable or do not configure this setting, Group Policy will take priority over the local preference setting.
Disable real-time protection in Group Policy
Warning
Disabling real-time protection drastically reduces the protection on your endpoints and is not recommended.
The main real-time protection capability is enabled by default, but you can disable it by using Local Group Policy Editor.
To disable real-time protection in Group policy
Open Local Group Policy Editor.
- In your Windows 10 or Windows 11 taskbar search box, type gpedit.
- Under Best match, select Edit group policy to launch Local Group Policy Editor.
In the left pane of Local Group Policy Editor
, expand the tree to Computer Configuration > Administrative Templates > Windows Components > Microsoft Defender Antivirus > Real-time Protection.In the Real-time Protection details pane on right, double-click Turn off real-time protection.
In the Turn off real-time protection setting window, set the option to Enabled.
select OK.
Close Local Group Policy Editor.

Tip
If you’re looking for Antivirus related information for other platforms, see:
- Set preferences for Microsoft Defender for Endpoint on macOS
- Microsoft Defender for Endpoint on Mac
- macOS Antivirus policy settings for Microsoft Defender Antivirus for Intune
- Set preferences for Microsoft Defender for Endpoint on Linux
- Microsoft Defender for Endpoint on Linux
- Configure Defender for Endpoint on Android features
- Configure Microsoft Defender for Endpoint on iOS features
See also
- Configure behavioral, heuristic, and real-time protection
- Microsoft Defender Antivirus in Windows 10
Обратная связь
Просмотреть все отзывы по странице
Как включить защитник Windows 10: 3 способа
Всем привет.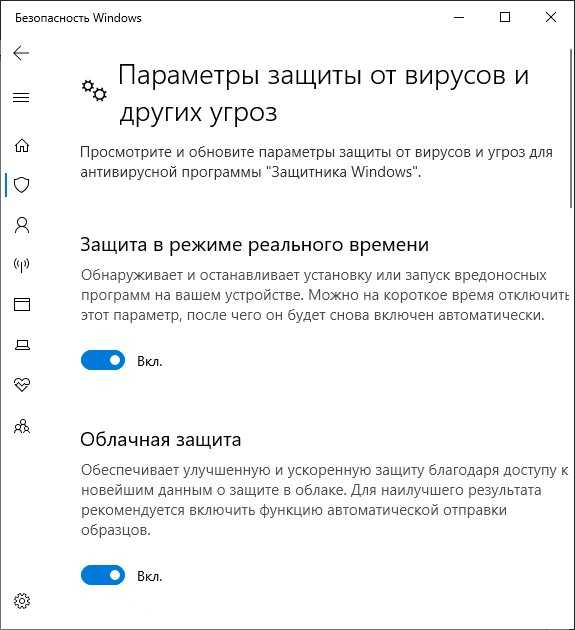 Сегодня столкнулся с проблемой – не могу обратно включить защитник Windows 10. Отключал его для запуска определенной программы. Напомню, что быстро он включается через «Пуск» и поисковую строку – просто вводим название службы и открываем программу.
Далее просто нажимаем по кнопке «Запустить».
Но бывают проблемы, когда защитник отказывается запускаться. Ниже в статье я привел несколько способов, которые помогут реанимировать родной антивирусник.
Содержание
- Способ 1: Редактор локальной групповой политики
- Способ 2: Редактор реестра
- Не удается включить
- Проверка службы
- Проверка целостности системных файлов
- Проверка антивирусным ПО
- Задать вопрос автору статьи
Способ 1: Редактор локальной групповой политики
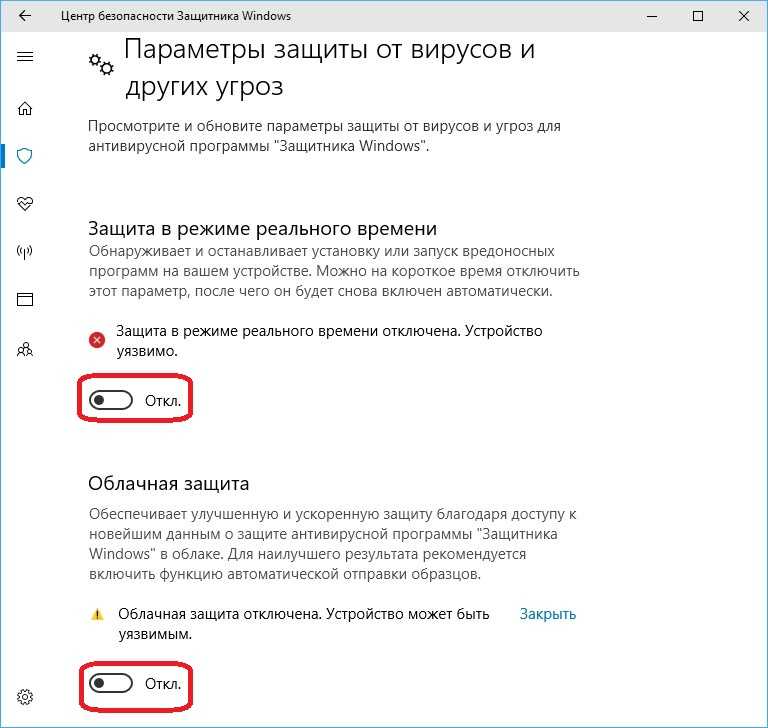
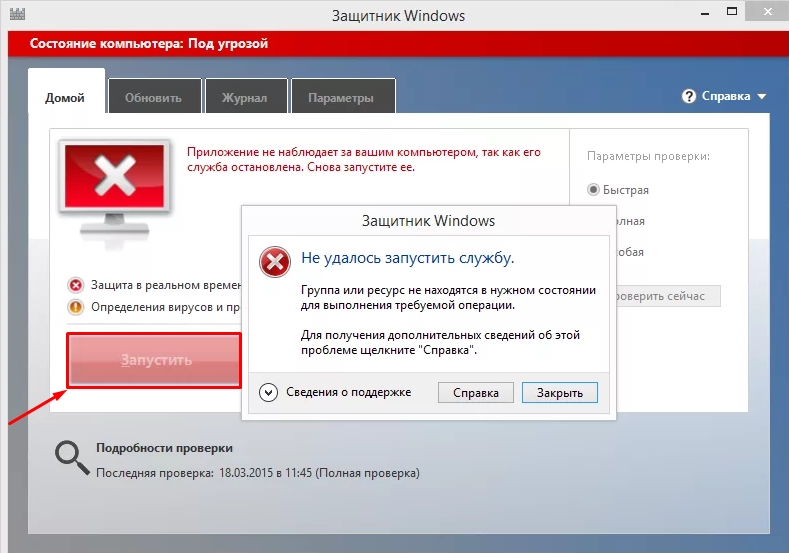
Если вы не сами отключали «Windows Defender», то при попытке запустить встроенный антивирус Windows можете увидеть вот такое окно с сообщением, что приложение выключено в групповой политике. Скорее всего вы ранее воспользовались специальной программой по отключению защитника.
- Заходим в «Редактор локальной групповой политики» – для этого нажимаем одновременно на клавиши и R и в окно «Выполнить» вводим команду: gpedit.msc. Редактор можно запустить и через поисковую строку в нижнем левом углу системы – простой введите название службы в строку и запустите.
- Слева находим основной раздел «Конфигурация компьютера», далее переходим в папку «Административные шаблоны», находим там «Компоненты Windows» и в самом конце переходим в раздел «Антивирусная программа защитник Windows» (в старых версиях винды может называться как «Endpoint Protection»). Там будет параметр, который начинается со слова «Выключить» – зайдите в него двойным щелчком левой кнопки мыши.
- Отключаем параметр или ставим в режим «Не задано».
- Аналогично сделайте с параметром «Защита в режиме реального времени».

После этого опять стандартным способом запускаем родной антивирусник. Если данный способ не помог, то вспомните не пользовались ли вы ранее программой «O&O ShutUp10» – это популярное приложение, которое позволяет отключить защитника. Попробуйте включить антивирус через него.
Способ 2: Редактор реестра
Чтобы зайти туда, используем наши любимые клавиши и R и команду: regedit. Или можете ввести слова «Редактор реестра» в поисковую строку. Далее слева будут папки различных разделов, вам нужно пройти по пути:
- Переходим в основную папку «HKEY_LOCAL_MACHINE».
- Далее заходим в «SOFTWARE» и находим там «Policies»
- Вот в подразделе «Microsoft» и будет нужная нам папка «Windows Defender».
Параметр, указанный на картинке ниже, нужно установить в режим ноль (0) – то есть деактивировать надстройку. Если параметра «DisableAntiSpyware» нет, то создайте его – кликните ПКМ по пустому полю и создайте параметр «REG_DWORD» со значение ноль (0). Систему исчисления выберите любую.
Раскройте папку «Windows Defender» и найдите подраздел «Real-Time Protection» – посмотрите, нет ли там параметра «DisableRealtimeMonitorin». Если данный параметр есть, то также выключите его, установив значение 0.
Не удается включить
Если основные способы не дали результата, то значит проблема лежит куда глубже. Но переживать не стоит, далее я привел несколько вариантов решения вопросы – как включить защитника Windows 10, если он не включается стандартными способами. После каждого из них, пытайтесь запустить защитник.
Проверка службы
Чтобы зайти в службы, нужно выполнить те же самые действия. Либо вы вводите название «Службы» в поиск и запускаете. Либо вы нажимаете на + R и вводите команду:
services.msc
Найдите «Службу Защитника Windows», сначала кликните ПКМ и запустите. Потом зайдите в «Свойства» и установите «тип запуска» в режим «Автоматически».
Проверка целостности системных файлов
Запустите командную строку от имени администратора – запустить утилиту можно через поиск.
Теперь поочередно вводим команды:
DISM /Online /Cleanup-Image /CheckHealth
DISM /Online /Cleanup-Image /RestoreHealth
sfc /scannow
Сначала система найдет поврежденные файлы образа ОС, а потом постарается их восстановить. Последняя команда восстанавливает уже отдельные системные файлы Windows.
Проверка антивирусным ПО
Вирусы также могут мешать работе данной программе. Я советую скачать и установить портативные версии антивирусных программ и проверить систему. Для этих целей подойдут:
- Web CureIt.
- Kaspersky Virus Removal Tool.
- Emsisoft Emergency Kit.
- ESET Online Scanner.
Можно попробовать даже зайти в систему через безопасный режим, а уже потом проверить её антивирусником. Инструкция по запуску безопасного режима читаем тут.
Как настроить безопасность Windows в Windows 10
Оставайтесь под защитой с помощью безопасности Windows в Windows 10 и 11
Важно обеспечить безопасность вашего компьютера с помощью безопасности Windows. Подверженность виртуальным угрозам может привести к серьезным последствиям, таким как кража личных данных, нарушение конфиденциальности и даже потеря данных.
Для этого:
Выберите Пуск > Параметры > Обновление и безопасность > Безопасность Windows, а затем Защита от вирусов и угроз > Управление параметрами . (В ранних версиях Windows 10 выберите Защита от вирусов и угроз > Параметры защиты от вирусов и угроз.)
В этой статье рассказывается, как использовать встроенные функции безопасности Windows 10 для обеспечения безопасности Windows и защиты вашего устройства от всех видов атак. .
Общие сведения о функциях безопасности Windows
Система безопасности Windows в Windows 10 и Windows 11 постоянно сканирует вашу систему на наличие вредоносных программ ( mal icious soft ware ), вирусы и другие киберугрозы и угрозы безопасности. В дополнение к этой защите в режиме реального времени система автоматически загружает обновления, чтобы обеспечить безопасность вашего устройства и защитить его от угроз.
Безопасность Windows — это ваш дом для управления инструментами, которые защищают ваше устройство и ваши данные:
- Защита от вирусов и угроз Антивирусная программа Microsoft Defender — сканирует ваше устройство, отслеживает угрозы, запускает сканирование и получает обновления для обнаружения последние угрозы. (В режиме Windows 10 S некоторые из этих параметров недоступны.)
- Защита учетной записи позволяет вам получить доступ к параметрам входа и настройкам учетной записи, включая Windows Hello и динамическую блокировку.
- Брандмауэр и защита сети. Управляйте настройками брандмауэра и следите за тем, что происходит с вашими сетями и подключениями к Интернету.
- Управление приложениями и браузерами. Обновите параметры SmartScreen Защитника Microsoft, чтобы помочь защитить ваше устройство от потенциально опасных приложений, файлов, сайтов и загрузок. У вас будет защита от эксплойтов, и вы сможете настроить параметры защиты для своих устройств.
- Безопасность устройства. Ознакомьтесь со встроенными параметрами безопасности Windows, чтобы защитить свое устройство от атак вредоносных программ.
- Производительность и работоспособность устройства. Просматривайте информацию о состоянии работоспособности вашего устройства, а также следите за чистотой и актуальностью устройства с помощью последней версии Windows.
- Семейные параметры. Отслеживайте онлайн-активность ваших детей и устройства в вашей семье.
 У вас будет защита от эксплойтов, и вы сможете настроить параметры защиты для своих устройств.
Помните: Мы уже обсуждали, как вы можете Начало работы с Windows 10 и как управлять учетными записями пользователей в Windows 10 . Пришло время защитить вашу систему с помощью системы безопасности Windows. Лучше предотвратить хакерскую атаку или проникновение вируса на ваше устройство.
Важная информация о безопасности Windows
Ниже приведены некоторые важные сведения о безопасности Windows в Windows 11/10, которые вам необходимо знать:
- Безопасность Windows обычно встроена в Windows. Он включает в себя антивирусную программу Microsoft Defender Antivirus. (Ранние версии Windows 10 называют его Центром безопасности Защитника Windows).
- Если в вашей системе установлено и включено другое антивирусное решение, антивирусная программа Microsoft Defender автоматически отключается.
- Если вы удалите или отключите стороннее антивирусное приложение, антивирусная программа Microsoft Defender автоматически включится.
 Он включает в себя антивирусную программу Microsoft Defender Antivirus. (Ранние версии Windows 10 называют его Центром безопасности Защитника Windows).
Используйте следующие способы защиты с помощью Windows Security
Настройка контроля учетных записей пользователей в Windows 10
Интерфейс управления учетными записями пользователей (сокращенно UAC) появляется, когда вы используете приложение, которое пытается внести изменения на вашем компьютере. Многие вредоносные программы стремятся использовать эту возможность и пытаются создать дыры в вашей безопасности, изменив ваши настройки. UAC гарантирует, что этого не произойдет.
UAC будет временно блокировать ваш экран всякий раз, когда приложение пытается изменить настройки вашего компьютера, пока администратор не подтвердит действие. Это дает вам время просмотреть детали программного обеспечения и, возможно, провести исследование, прежде чем разрешить ему вносить изменения в вашу систему.
Вот как включить контроль учетных записей в Windows 10 и настроить его по своему вкусу.
- Нажмите клавиши Windows и S , чтобы открыть панель поиска, или начните вводить текст в области поиска на панели задач. (Если вы не видите поле поиска, щелкните правой кнопкой мыши кнопку «Пуск» и выберите Поиск .)
- Введите Контроль учетных записей пользователей в поле поиска.
- Нажмите Изменить настройки контроля учетных записей из результатов поиска.
- Чтобы включить UAC, перетащите ползунок вверх до желаемого уровня безопасности на вашем устройстве, затем нажмите OK .
- Перетащите ползунок вниз до Никогда не уведомлять и нажмите OK, чтобы выключить UAC . (Не рекомендуется).
- При появлении запроса подтвердите свой выбор, введя пароль администратора.
- Перезагрузите компьютер, чтобы изменения вступили в силу.

Используйте Защитник Windows для обеспечения безопасности Windows
Защитник Windows — это встроенное в Windows 10 решение для обеспечения безопасности Windows 10 от вредоносных программ и других вредоносных угроз (защита от вредоносных программ). По сути, это встроенный антивирус, обеспечивающий вашу безопасность при работе в Интернете, загрузке или получении файлов. Он способен проводить регулярное сканирование вашего устройства, просматривать ваши данные и находить даже скрытые вредоносные программы или потенциально вредоносные приложения.
В отличие от многих сторонних антивирусных решений, Microsoft Defender для Windows защищает вас в режиме реального времени, не замедляя работу вашего устройства.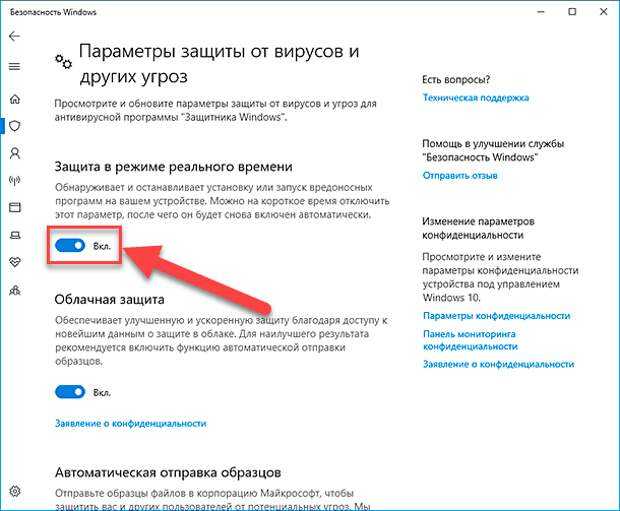
Вот как вы можете включить антивирус Microsoft Defender и начать защищать свой компьютер.
- Щелкните меню Пуск на панели задач. На этом значке есть логотип Windows 10. Если вы не знакомы с интерфейсом Windows 10, мы рекомендуем прочитать Начало работы с Windows 10 статья на нашем сайте.
- Выберите значок Настройки , обозначенный шестеренкой. Кроме того, вы можете использовать сочетание клавиш Windows + I , чтобы быстрее получить доступ к этому приложению.
- Щелкните плитку Обновление и безопасность .
- Перейдите на вкладку Безопасность Windows , затем нажмите кнопку Открыть Безопасность Windows .
- Управляйте своими настройками, нажимая на любую плитку здесь. После внесения изменений перезагрузите компьютер, чтобы завершить процесс.
Запустить быстрое сканирование в Windows Security
Чтобы запустить быстрое сканирование с помощью антивируса Microsoft Defender:
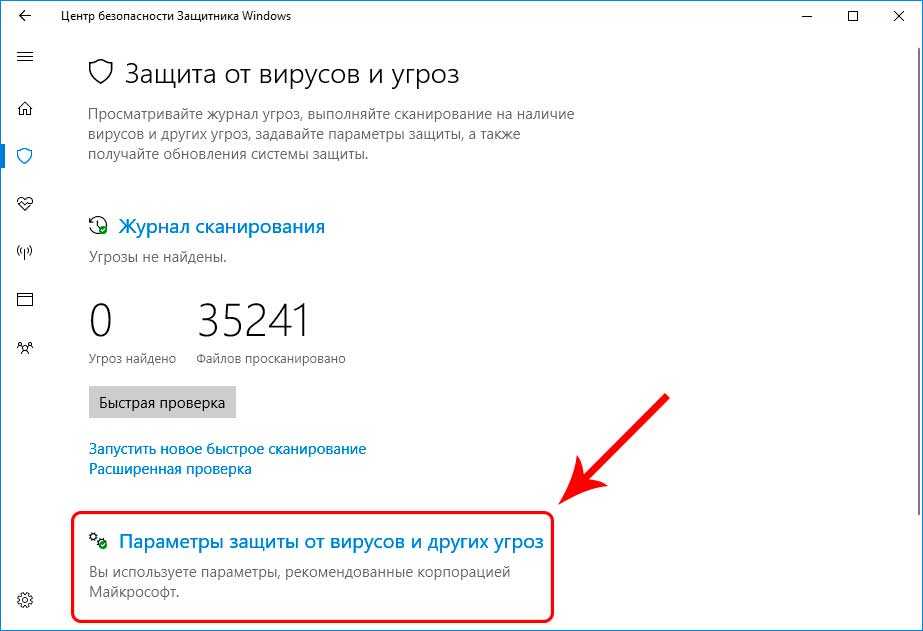
Выберите Пуск > Настройки > Обновление и безопасность > Безопасность Windows и затем Защита от вирусов и угроз (антивирус Microsoft Defender) .
Откройте настройки безопасности Windows — центр безопасности защитника WindowsВ разделе Текущие угрозы выберите Быстрое сканирование (или в ранних версиях Windows 10 в разделе История угроз выберите Сканировать сейчас ).
 Откройте настройки безопасности Windows — центр безопасности защитника Windows
Если при сканировании проблем не обнаружено, но вы все еще обеспокоены, вы можете более тщательно проверить свое устройство.
Запустить расширенное сканирование в системе безопасности Windows
Что такое расширенное сканирование в системе безопасности Windows?
Несмотря на все ваши усилия по обеспечению безопасности и даже после быстрого сканирования, вы можете обнаружить, что в вашей операционной системе обнаружен вирус или вредоносное ПО. Вредоносное ПО не доставляет удовольствия и часто замедляет работу вашего компьютера. Если они сохраняются, вам может потребоваться использовать Защитник окон для запуска расширенного сканирования системы.
Чтобы сделать это с помощью антивируса Microsoft Defender, выполните следующие простые действия.
- Выбрать Пуск > Настройки > Обновление и безопасность > Безопасность Windows и затем Защита от вирусов и угроз .
- В разделе Текущие угрозы выберите Параметры сканирования (или в ранних версиях Windows 10 выберите Запустить новое расширенное сканирование ) в разделе История угроз.
- Выберите один из вариантов сканирования:
- Полное сканирование (проверьте файлы и программы, запущенные в данный момент на вашем устройстве)
- Выборочное сканирование (сканирование определенных файлов или папок)
- Автономное сканирование Microsoft Defender (запустите это сканирование, если ваше устройство было или может быть заражено вирусом или вредоносным ПО).
- Выберите Сканировать сейчас .

Использовать брандмауэр Windows
Брандмауэр предназначен для защиты вашего интернет-соединения и вашей сети. Вот как включить его и защитить свое устройство от еще одного уровня атак.
- Нажмите клавиши Windows и S , чтобы открыть панель поиска, или начните вводить текст в области поиска на панели задач. (Если вы не видите поле поиска, щелкните правой кнопкой мыши кнопку «Пуск» и выберите Поиск .)
- Введите Панель управления в поле поиска. Когда интерфейс откроется, обязательно измените режим просмотра на Крупные значки или Маленькие значки .
- Нажмите Брандмауэр Защитника Windows . Нажмите ссылку Включить и отключить брандмауэр Windows на левой панели в новом окне. При появлении запроса подтвердите свой выбор, введя пароль администратора Windows 10.
- Обязательно выберите Включить брандмауэр Защитника Windows как для параметров частной сети, так и для параметров общедоступной сети. Когда закончите, нажмите кнопку OK .
 При появлении запроса подтвердите свой выбор, введя пароль администратора Windows 10.
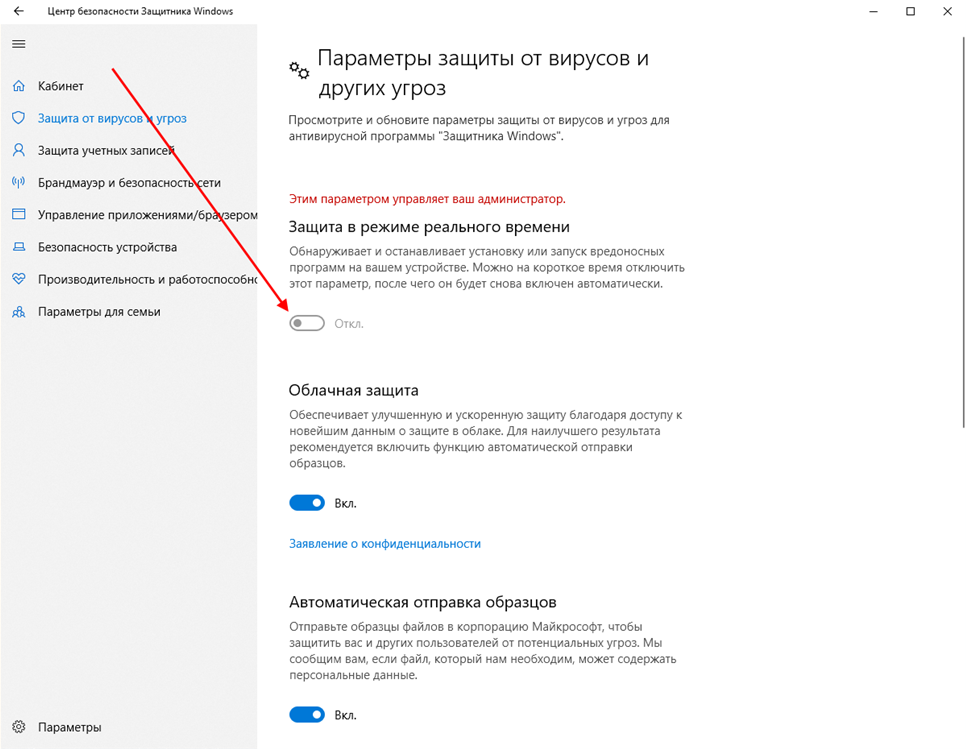
 Включение или отключение защиты антивирусной программы Microsoft Defender в режиме реального времени.
Иногда может потребоваться ненадолго остановить работу Защитника Windows в режиме реального времени. Но дело не в том, что, когда защита в режиме реального времени отключена, файлы, которые вы открываете или загружаете, не будут проверяться на наличие вредоносных программ и других угроз. Однако вскоре для защиты вашего устройства автоматически включится защита в режиме реального времени.
Чтобы временно отключить антивирусную защиту Microsoft Defender в режиме реального времени.
- Выбрать Пуск > Настройки > Обновление и безопасность > Безопасность Windows
- Перейти к Защита от вирусов и угроз > Управление настройками . (В ранних версиях Windows 10 выберите Защита от вирусов и угроз > Параметры защиты от вирусов и угроз .) Откройте настройки безопасности Windows .
- Установите для параметра Защита в режиме реального времени значение Выкл. и выберите Да для проверки.
 (В ранних версиях Windows 10 выберите Защита от вирусов и угроз > Параметры защиты от вирусов и угроз .) Откройте настройки безопасности Windows
Использовать Windows SmartScreen
Если ваш компьютер обнаружит какую-либо подозрительную активность при открытии файла или приложения, вы увидите, что Windows SmartScreen останавливает активность на вашем устройстве. Это состояние продолжается до тех пор, пока вы не отмените или не одобрите действие.
В большинстве случаев всегда следует отменять открытие потенциально вредоносного файла, если только вы не можете убедиться, что он не нанесет вреда вашему устройству.
Вот как можно включить Windows SmartScreen при использовании Windows 10:
- Щелкните меню Пуск на панели задач.
- Выберите значок Настройки , обозначенный шестеренкой. Кроме того, вы можете использовать сочетание клавиш Windows + I , чтобы быстрее получить доступ к этому приложению.
- Используйте поле поиска и введите SmartScreen . Здесь нажмите Управление приложениями и браузером , чтобы быстро открыть соответствующую страницу в приложении безопасности Windows.
- Переключите все настройки, связанные со SmartScreen, на Блокировать , Предупреждать или Вкл., в зависимости от ваших предпочтений.
- Перезагрузите устройство, чтобы изменения вступили в силу.

Как обеспечить безопасность Windows Windows 10
Вот как обеспечить безопасность Windows в ОС Windows 10.
1. Обновление Windows
Обновление операционной системы — один из лучших способов убедиться, что у вас нет дыр в безопасности.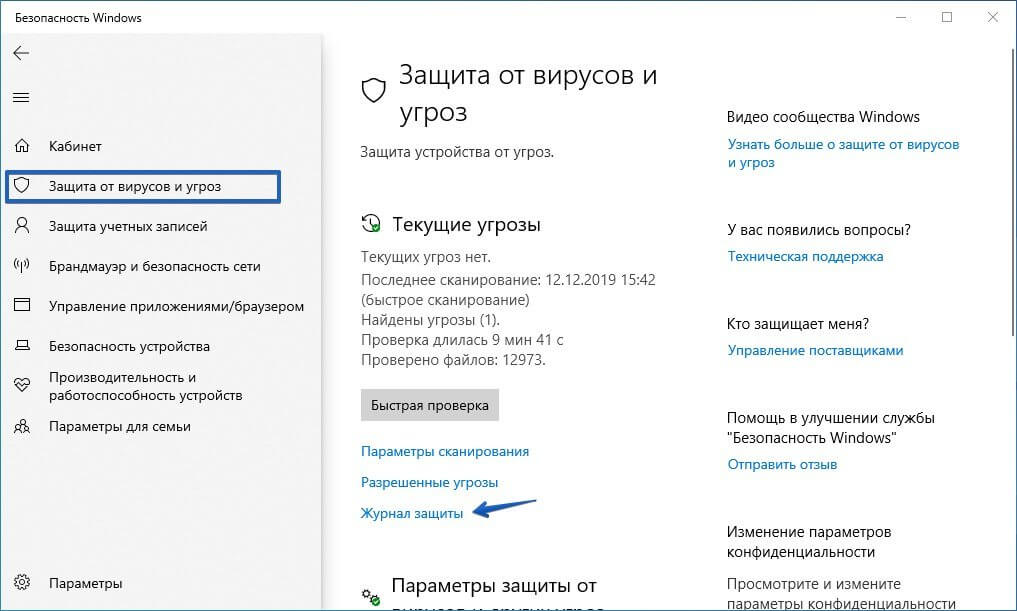 Вот как обновить Windows 10 до последней доступной версии.
- Откройте меню «Пуск», нажмите клавишу Windows на клавиатуре и выберите Настройки . Это приложение имеет значок в виде шестеренки.
- Можно также использовать сочетание клавиш Windows + I для более быстрого доступа к приложению «Настройки».
- Можно также использовать сочетание клавиш Windows + I для более быстрого доступа к приложению «Настройки».
- На экране должны появиться различные плитки, ведущие к различным центрам конфигурации вашего устройства. Здесь щелкните плитку Update & Security .
- Переключитесь на вкладку Windows Update с помощью левой панели.
- Нажмите кнопку Проверить наличие обновлений . Для этой функции требуется активное подключение к Интернету, поэтому Windows 10 может обнаруживать любые новые версии, доступные для загрузки.
- Если обновление найдено и вы имеете право на загрузку, нажмите кнопку Установить . Вам нужно подождать, пока Windows 10 загрузит и применит обновление, что может занять длительное время.
- Убедитесь, что вы не прерываете подключение к Интернету во время обновления, не отключайте устройство от сети и не выключайте его вручную. Эти действия сопряжены с высоким риском нарушения процесса обновления и могут привести к повреждению системы и потере данных.
- После того, как ваш компьютер завершит обновление, вы должны установить последнюю версию Windows 10, доступную в настоящее время.
 Вам нужно подождать, пока Windows 10 загрузит и применит обновление, что может занять длительное время.
2. Создание резервных копий
Создание резервной копии системы может сохранить ваши данные, даже если ваше устройство заражено вредоносным ПО или подверглось атаке хакера. Вот как настроить резервное копирование в Windows 10.
- Щелкните меню Пуск на панели задач.
- Выберите Настройки значок, обозначенный шестеренкой. Кроме того, вы можете использовать сочетание клавиш Windows + I , чтобы быстрее получить доступ к этому приложению.
- Щелкните плитку Обновление и безопасность .
- Перейдите на вкладку Backup . Чтобы начать резервное копирование, нажмите кнопку + Добавить диск и выберите локальный диск, который вы хотите использовать для хранения резервных копий. Следуйте всем инструкциям на экране, чтобы начать резервное копирование нужных данных.

3. Запланируйте собственное время сканирования для безопасности Windows
Несмотря на то, что служба безопасности Windows регулярно сканирует ваше устройство для обеспечения его безопасности, вы можете указать, когда и как часто должно выполняться сканирование.
Чтобы запланировать проверку безопасности Windows с помощью антивирусной программы Microsoft Defender, выполните следующие действия:
- Нажмите кнопку Пуск и введите расписания задач в Поиск поле
- В списке результатов выберите Планировщик заданий .
- Щелкните стрелку (>) рядом с библиотекой планировщика заданий на левой панели, чтобы развернуть ее. Затем сделайте то же самое с Microsoft > Windows.
- Затем прокрутите вниз и выберите папку Защитника Windows .
- В верхней центральной панели выберите Плановое сканирование Защитника Windows. (Наведите указатель мыши на варианты, чтобы увидеть полные имена.)
- На панели Действия справа прокрутите вниз и выберите Свойства .
- В открывшемся окне выберите вкладку Triggers , а затем выберите New .
- Укажите предпочитаемое время и частоту, а затем выберите OK .
- Просмотрите расписание и выберите OK .
Заключительные мысли
Мы надеемся, что это руководство смогло показать вам все, что вам нужно знать об управлении учетными записями пользователей в Windows 10. Если вам когда-либо понадобится дополнительная помощь, наша служба поддержки клиентов будет рада помочь вам решить любые проблемы. Ты можешь иметь.
Хотите узнать больше об операционной системе Windows 10? Мы рекомендуем перейти к нашей статье «Установка и удаление приложений в Windows 10 » или вернуться на нашу главную страницу руководств по Windows 10, чтобы найти следующий урок.
Если вы ищете дополнительные руководства или хотите прочитать больше технических статей, подпишитесь на нашу рассылку новостей или посетите наш справочный центр. Мы регулярно публикуем учебные пособия, новостные статьи и руководства, чтобы помочь вам.
Вам также может быть интересно прочитать
> Как отменить обновление Windows 11 и остаться на Windows 10?
> Как исправить сбой Microsoft Store в Windows 10
Вопросы и ответы по безопасности Windows
Безопасность Windows так же хороша, как и антивирус?
Windows Security Defender или Microsoft Defender — хорошее решение для защиты от вирусов и угроз. Это лучше, чем у большинства бесплатных антивирусов , особенно с добавлением инструментов песочницы и облачного обнаружения вредоносных программ — функций, которые не включены во многие бесплатные антивирусные программы.
Нужно ли мне антивирусное программное обеспечение, если у меня есть Защитник Windows?
Да. Безопасность Windows сканирует вашу систему, включая электронную почту, интернет-браузер, облако и приложения, на наличие вредоносных программ и киберугроз. Однако Защитнику Windows не хватает защиты конечных точек и ответа, а также автоматического расследования и исправления, поэтому необходимо дополнительное антивирусное программное обеспечение . Обновленная система безопасности Windows в Windows 11 и 10 может быть лучшим вариантом.
Является ли безопасность Windows такой же, как Защитник Windows?
Microsoft переименовала Microsoft Defender Antivirus в Windows Security в более новых версиях Windows 10 и 11. По сути, Защитник Windows — это антивирусная программа, а другие компоненты, такие как контролируемый доступ к папкам и облачная защита вместе с Защитником Windows, они называется Безопасность Windows.
Достаточно ли хорош брандмауэр Windows?
Брандмауэр Windows в системе безопасности Windows — надежное и надежное решение для защиты Windows. Хотя люди могут спорить о вирусах Microsoft Security Essentials/Windows Security и уровне обнаружения угроз, брандмауэр Windows так же хорошо блокирует входящие соединения, как и другие брандмауэры.
Есть ли в Windows 10 встроенный антивирус?
Да. Windows 11 и 11 включают в себя Windows Security, ранее известный как антивирус Microsoft Defender, который обеспечивает новейшую защиту от вирусов и угроз. Ваше устройство остается активно защищенным с момента запуска Windows, и ваша операционная система всегда защищена, если вы не отключите защиту от вирусов и угроз. Безопасность Windows постоянно сканирует на наличие вредоносных программ (вредоносных программ), вирусов и угроз безопасности.
Может ли Защитник Windows удалить троян?
Microsoft Windows Security, ранее известный как Защитник Windows, защищает пользователей Windows от вирусов, вредоносных и других программ-шпионов. Вы можете использовать его для обнаружения и удаления троянов из вашей системы Windows 10.
Как включить Защитник Windows?
- Нажмите кнопку «Пуск».
- Нажмите кнопку «Настройки» в левой части меню «Пуск».
- Щелкните Обновление и безопасность.
- С левой стороны щелкните Защитник Windows.
- Переместите кнопку в разделе «Защита в реальном времени» в положение «Вкл.» или «Выкл.».
Обнаружит ли Защитник Windows вредоносное ПО?
Microsoft Windows Security, ранее называвшаяся Защитником Windows, представляет собой сканер вредоносных программ, который сегодня известен как защита от вирусов и угроз. Он является частью пакета безопасности Windows и будет искать любые файлы или программы на вашем компьютере, которые могут причинить вред. Защита от вирусов и угроз ищет программные угрозы, такие как вредоносное ПО, вирусы и другие киберугрозы, в электронной почте, приложениях, облаке, Интернете и Phone EXE, предупреждает вас и изолирует или удаляет их.
Что такое предупреждение системы безопасности Защитника Windows?
Предупреждение Защитника Windows о защите от вирусов и угроз, которое может случайным образом появиться на вашем экране, представляет собой тип вредоносного ПО, которое хочет, чтобы вы связались с мошенниками. Вы можете заразиться им, посетив подозрительный веб-сайт, нажав на вредоносную ссылку или просто установив рекламное ПО на свой компьютер. Избегай это.
Достаточно ли безопасности Windows 2022?
По сути, Безопасность Windows достаточно хороша для вашего компьютера в 2022 году. Но некоторое время назад это было не так. Ранее Защитник Windows не был сложной антивирусной программой для защиты от современных угроз и вредоносных программ в 2022 году.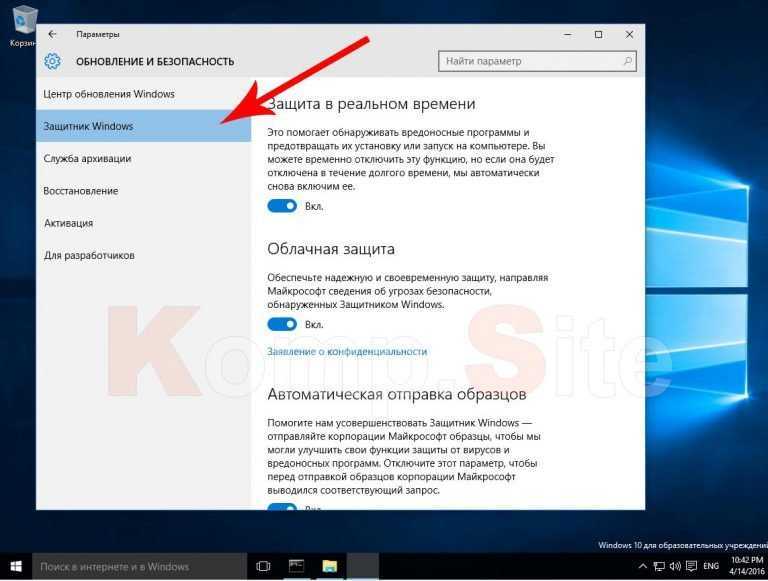 К сожалению, он также часто вылетал во время обновлений, из-за чего у него была плохая репутация. Но текущий пакет безопасности Windows в Windows 10 и 11 — достаточно хорошее антивирусное решение.
Как включить Защитник Windows
СОДЕРЖИМОЕ СТРАНИЦЫ:
- Что такое Защитник Windows
- Как включить Защитник Windows [с пошаговыми инструкциями]
Windows предоставляет встроенную антивирусную защиту для пользователей Windows, называемую Защитником Windows или Безопасностью Windows в Windows 10 и 11. Защитник Windows может помочь защитить ваш компьютер от вирусов, вредоносных программ и других угроз. Защитник Windows автоматически включается на вашем компьютере. А если вы по какой-то причине отключите Защитник Windows, вам нужно будет вручную включить защиту.
В этой статье объясняется, как включить Защитник Windows для соответствия антивирусным политикам вашей компании и устранения проблем с доступностью.
Что такое Защитник Windows
Программа под названием Защитник Windows защищает ваш персональный компьютер от вирусов и других угроз. Для предотвращения несанкционированного доступа и защиты систем Windows от вредоносных программ был создан антишпионский инструмент. С момента выпуска установочного пакета Windows Vista Microsoft Security Essentials доступен для бесплатной загрузки. Microsoft AntiSpyware — это прежнее название Защитника Windows. Антивирусная программа Microsoft Defender — это основная антивирусная программа на устройстве, когда оно находится в активном режиме. Риски устраняются, файлы проверяются, а угрозы заносятся в список Защитника Windows.
Как включить Защитник Windows [с пошаговыми инструкциями]
Защитник Windows — это бесплатный инструмент, поставляемый с операционной системой Windows 8/10/11, который помогает защитить ваш компьютер от угроз безопасности, таких как вирусы, шпионское и вредоносное ПО. Это функция антивирусной программы Microsoft Windows. В отличие от других антивирусных программ сторонних производителей, Защитник Windows не нужно загружать и устанавливать отдельно. Безопасность Windows, Защитник Microsoft, Антивирусная программа «Защитник Windows» или Антивирусная программа «Защитник Microsoft» — это дополнительные имена для Защитника Windows. Давайте рассмотрим методы один за другим. Это:
1. Включить Защитник Windows в Windows 11
2. Включить Защитник Windows в Windows 10
3. Включить Защитник Windows в Windows 8
1. Включить Защитник Windows в Windows 11
Большинство настроек Windows 11 в одном месте. На панели «Параметры системы» пользователи могут настраивать системы, добавлять новых пользователей и обновлять Windows. Если Защитник Майкрософт отключен, то для включения Защитника Windows выполните следующие действия:
Шаг 1. Чтобы перейти к настройкам системы, нажмите «Пуск», а затем нажмите «Настройки».
Шаг 2. В настройках Windows нажмите «Конфиденциальность и безопасность» и выберите «Безопасность Windows» на правой панели экрана.
Шаг 3. На панели настроек безопасности Windows нажмите кнопку «Открыть безопасность Windows», как показано ниже.
Шаг 4. Вы можете войти в каждый сетевой профиль выше и включить или выключить «брандмауэр Microsoft Defender» для каждого из них.
Шаг 5. Выберите «сетевой профиль» и включите его или включите, если он уже отключен.
Шаг 6. Если профиль включен, вы можете «отключить» или выключить его.
Шаг 7. Затем перейдите в раздел «Защита от вирусов и угроз» в меню слева. В разделе «Защита от вирусов и угроз» на правой панели нажмите ссылку «Управление настройками». Затем включите или включите «Защиту в режиме реального времени» и «Защиту из облака».
Шаг 8. Управление приложением и браузером также можно отключить или отключить.
2. Включите Защитник Windows в Windows 10
После многочисленных улучшений и обновлений теперь довольно легко отключить или включить Защитник Windows в Windows 10 на данный момент. После завершения этого процесса будет доступно встроенное приложение защиты Windows 10.
Шаг 1. Для начала нажмите на логотип «Win» на панели задач и выберите значок «Настройки».
Шаг 2. Нажмите «Обновление и безопасность».
Шаг 3. Нажмите «Безопасность Windows» и выберите «Защита от вирусов и угроз».
Шаг 4. В разделе «Настройки защиты от вирусов и угроз» нажмите ссылку «Управление настройками».
Шаг 5. Щелкните тумблер в разделе «Защита в режиме реального времени».
Шаг 6. Выберите «Да», когда появится запрос управления учетными записями пользователей.
3. Включите Защитник Windows в Windows 8
Если вы узнали, что Защитник Windows в Windows 8 был отключен, вы можете использовать Центр уведомлений, чтобы проверить его состояние, а затем снова включить его, следуя инструкциям. ниже.
Шаг 1. Введите «Центр поддержки» в правом верхнем поле поиска панели управления и нажмите «Центр поддержки» для входа.
Ваш комментарий будет первым